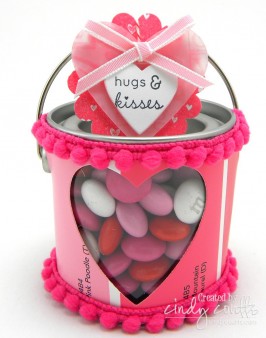
Good morning and a very blessed Sunday to you. Isn't this just the cutest little mini paint can that you've ever seen?! I picked up about 20 of these at Michael's a few weeks ago because they're great gifts to give for anything from birthdays to holidays that everybody can enjoy. The possibilities are endless on how to decorate them too. This is what I made for my kids and their friends for Valentine's Day tomorrow. This is one of the more detailed projects that I made and wish to share with you.
Thank you so much for stopping by and may you have a Spirit-filled day!

Stamps: Papertrey Ink 2010 Love Tags, Stampin' Up! I {Love} Love Jumbo Wheel
Card Stock: Papertrey Ink Stamper’s Select White, Vellum Paper
Ink: Memento Tuxedo Black, Stampin' Up! Pink Pirouette, Regal Rose, Versamark
Accessories: Stampin' Up! 1/8” Pretty in Pink Taffeta Ribbon, Melon Mambo PomPom Trim, Scallop Circle punch, Heart punch, Itty Bitty Shapes Circle punch (1/2 inch), Corner Rounder punch, Regal Rose chalk, Clear Embossing Powder, Papertrey Ink Pure Poppy Baker’s Twine, Heart Prints die-cuts, mini paint can from Michael’s, color paint swatch from True Value Hardware, M&M Candy
Technique: Die-cutting, punching, chalking, ink distressing, heat embossing

1. Purchase a mini paint can from craft store and pick out color paint swatch strips from home improvement store in pink/red/purple color tones.
2. Cut paint swatches to 2” x 8-1/16” making sure that the print color name of the paint swatches are at the bottom and not cut, then corner round the edges.
3. Cut a piece of scratch paper to the measurements above and wrap around mini paint can to get your measurements to punch for the side of the can holes, at approximately 2” and 3-1/2”. Draw a line on the scratch paper to where the handle is and transfer to color paint swatch.
4. Using a ½” circle punch, punch a hole directly under your line on the paint swatch, and cut line with a pair of snip scissors.
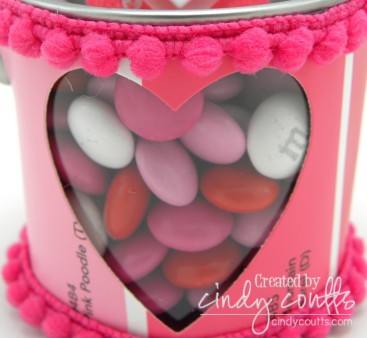
5. Exactly between the paint can handle holes, punch out a heart to make a window.
6. Place sticky strip on the back of the paint swatch and wrap around the can lining up the holes in the paint swatch with those on the mini paint can.
7. Use mini glue dots to adhere the snipped part of the paint swatch to the mini paint can.
8. Wrap PomPom ribbon around the top and bottom of the mini paint can using mini glue dots to adhere.
9. Ink up the jumbo wheel in the supply list with Versamark and run along vellum paper, cover with clear embossing powder, shake off excess, then heat emboss. Punch out a large heart and apply chalk with a dauber.
10. Stamp solid image with hearts onto white card stock with ink and punch out with a scallop circle punch.
11. Die-cut a small heart using white card stock and stamp sentiment with black ink, then ink distress the edges in light pink ink.
12. Layer small heart above onto vellum heart with foam dots and then place a foam dot on the back of the vellum heart behind the white sentiment heart and adhere to the scallop circle.
13. Punch a small 1/8” hole through the vellum heart and scallop circle and tie to the top of the mini paint can handle with baker’s twine.
14. Tie a bow with pink 1/8” ribbon and adhere over the punched hole with sticky strip.
15. Fill the mini pain can with M&Ms.


Wow these are the absolute cutest….wish I had thought of it. Hubby's birthday is coming up might have to steal it for that 😉
Thanks for sharing and for the instructions…Great Job!!!
this is adorable!