Hello there! I'm taking the Creative Chemistry 103 class presented by Tim Holtz. This man has single-handedly revolutionized the crafting and mixed media industry with his amazing line of distress products, stamps, paper, die-cuts, ephemera, trinkets; his entire product line is unbelievably awesome, and I love it all! He's also a wonderful teacher.
Every day this week, he will be presenting a variety of videos and demonstrating new techniques that you can do with distress. I'd eventually like to make a project with all of the new techniques I'm learning, but yesterday alone, he showed us 7 or so. I picked a technique that I could do in a relatively short amount of time and one that I felt fairly confident in doing.
A couple of years ago, I did a video on how to make your own distress resist paper on kraft card stock and it worked great, as well as opening up the door to a lot of possible patterns that you can customize using your own stamps. I also made a video with suggestions and organizing your ink blending tools not too long ago.
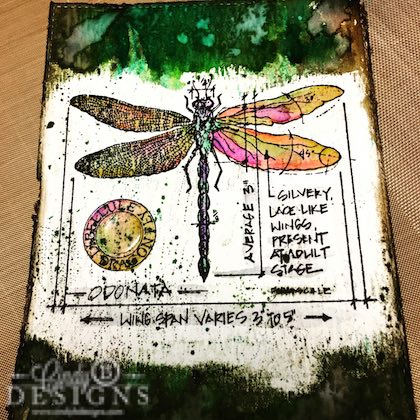
Today's card panel is a technique called watercolor resist. You stamp on watercolor paper with archival ink, which is permanent and can take a beating. You choose an image and color it in using Distress Markers scribbled on your craft sheet and a paint brush with water. You completely control what you're doing. You should not put a Distress Marker directly onto wet watercolor paper as it will pill up. There were several times where I was not happy with my coloring as I wanted it to be more vivid. I discovered that I can take a Distress Marker directly to wet watercolor card stock by using the side of the marker to gently tap or thump where I wanted more color in the image and then colored and blended it out. Distress plays very well with the entire distress line of products. I used the same stamp set that Tim did of Stamper's Anonymous Classics #1 and used the dragonfly for my image. I'm very partial to dragonflies and butterflies and have 2 tattoos to prove it. I colored in the dragonfly using the same colors that is on my tattoo. I did not write down how many markers I used, but you get an idea by looking at the image. This technique was a lot of fun. Distress marker properties always reacts with water. With my card panel, I applied Distress Glaze over my image and that seals the image so that it does not react with water, which was how I was able to get my color on the rest of the panel using Distress Spray that I sprayed onto my craft sheet and swiped my water color paper through it to cover where the Distress Glaze was not applied. I then used a Distress Edge Tool to rough up the sides of my image panel and then used Walnut Stain Distress Ink with an ink foam tool and dabbed it on the edges. I adhered an epoxy circle to the center of the circle on the image using Glossy Accents. Then, I splattered with Black Soot Distress Ink. I used my Distress Sprayer to achieve the splotches that picks up the ink when you let the water sit for about 20 seconds and pat it with a paper towel to reveal your splotches. I think it turned out pretty cool. I plan on adding a few embellishments to the image panel and then adhere it to an A2 top-folding Cocoa Bean card base by Papertrey Ink. The Cocoa Bean is the perfect brown complimentary color for my image panel.
I hope that you are inspired by my panel. When I try a new technique, I generally almost CASE what the video tutorial demonstrates as I want to learn the technique and not be bothered with having to pick and choose as I'm learning, but do add my own touches to it throughout. With this technique, I used a full sheet of water color card stock rather than a tag, distressed the edges, added the epoxy dot and used different but similar colors on my dragonfly.
Thank you so much for stopping by to visit me today. I'm up to $750 now in my Instagram prize giveaway if I reach 500 followers by August 15. God bless and I will see you back tomorrow with the tag that I'm working on right now and it's turning out very cool — so far.