Hello there and a very happy Monday to you!
I made this card for My Favorite Things Wednesday Sketch Challenge 280 at CardChallenges.com. I haven't had the chance to make some blog revisions so that I can direct link you to their products or show off my Affiliate badge!
I used so. much. stuff. on this card and it's all listed in the Tags section below. I will describe to you how I made this card. This was a 2-day card folks. I don't mean 2 solid days working on it. I mean 2 days of starting in one afternoon, live life, do what you have to do, and work on the card between life. I always make sure that I'm out of the craft room at 5 pm. After this card, it looks like a natural disaster hit. There's stuff all over the place!
It's rare that I create scene cards but with the new Make Yourself at Home stamp set and Die-Namics by Lisa Johnson Designs, it begs for scene cards.
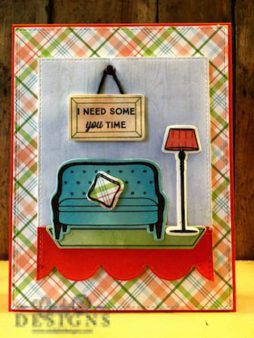
I started out with an 8-1/2 x 11 Persimmon card base, cut at 4-1/4', turned and scored at 5-1/2'. I have never used this much patterned paper on a card in years, if ever, so I got my box of MFT Paper Packs. I chose a really cool background of Subtle Plaids and die-cut the panel with Blueprints 15 and adhered that to the card base. I used a piece of paper from Watercolor Wash in Blue Breeze and die-cut a piece of that using the largest Stitched Rectangle Die-Namics. I found a piece of Persimmon card stock in my scrap bag that was die-cut with Stitched Scallops Die-Namics and trimmed that down to the size of the Blue Breeze Watercolor Wash Paper Pack and adhered it to the very bottom of the panel making sure my stitched detail was lined up. I then inked up both pieces using the Wood Plank Background Stamp with Grout Gray for texture and it barely shows up, but it's there and makes a difference. I then adhered fun foam to the back of the image panel.
For my images, I die-cut the sofa from Blu Raspberry card stock stamped with Memento Tuxedo Black Ink and colored that in using the #64 pencil from the Spectrum Noir Marine/Ocean Collection, colored the edges, and then used a blending stump with Gamsol to color it out. I surprised myself with how well that turned out. For the "dots" in the sofa, I used a Sakura Blue Metallic Gelly Roll Pen and added the dots. That really made the sofa pop. I used the same plaid paper to die-cut a pillow for the sofa that was adhered with a foam dot to pull that patterned paper to the forefront a bit. I stamped and die-cut the rug with Sour Apple card stock. The lamp was stamped and die-cut onto Smooth White card stock and the lamp shade was paper pieced with a pattern from Tribal Prints. The outline of the lamp and sofa were both colored in with a Stampin' Up! Soft Suede marker using the very thin journaling tip to stay in the lines like a big girl. For my picture frame, that fabulous sentiment was stamped onto a piece of Coral Crush paper from the Watercolor Wash Paper Pack with Memento Tuxedo Black Ink. I performed a little stamp surgery on the sentiment so it would fit inside the frame. I used Gumdrop Green Premium Dye Ink to stamp the frame. I found some black twine from The Twinery lying on my desk from the other day when I made that cool graduation card, placed some small foam dots on the back of the picture frame, added the black twine and used a brad to secure it to the "wall" of the scene.
Once that was all completed, I tore off the Scor-Tape from the other side of the fun foam and adhered it to the center of the card. I'm going to finish the inside of the card and send it to my girlfriend in the Bay Area so she can give it to her husband.
Thank you so very much for stopping by to visit me today and God bless. I'll see you soon with another card or video or something! Take care.


Shop Cindy B Designs Boutique. You will love the experience! Simply click on the shopping bag above and enter a world of beauty hand-crafted for you.
Need Stampin' Up! products? Just click on the button above to shop with me 24/7 from the comfort of your own home!


