Hello there everybody! I'm not afraid to make mushy cards anymore! It's been 4 years since I was into that (insert bad word) I used to believe in, and I still don't believe in it, but I'm not going to let the fear get to me in that I can't be like everybody else and make a romance or love card. I think the catalyst is getting over fear in general, a lot of fear about a lot of things. God is not fear, so it's easily identifiable where the fear was coming from. God only has great things for me that He wants and it's also what I ultimately want.
I made this fun card using My Favorite Things Stamps Prehistoric Fun. Now who can resist the sentiments coupled with the fabulous and fun images that you can also use other stamp sets with for an awesome little boy card?
I enjoyed coloring this one. I broke out my Spectrum Noir Colored Pencils and Gamsol with some paper blending stumps and just started to color. I have not done that technique in forever, but it's making a comeback. At least it's a good comeback compared to the neon hippy baggy clothes you are seeing in stores for the spring and summer. I am not a flower child by any means. I was still in diapers when that came around the first time. I will not even try wearing anything remotely close to what you see in stores. At last year's HS reunion, I did black suede flare pants for the mixer on Friday and even that was barely doable.
My Tim Holtz ink distressed background is a completely different story and it was a drag and something that had never happened to me before. I used his watercolor paper and Mowed Lawn Distress Ink for my "grass," and Tumbled Glass for the "sky." Great colors and looking good, right? Uh, no. It was all good until I tried to soften up and blend the transition between the grass and the sky. Even though I have a mini foam pad dedicated to each color, blending out the Mowed Grass and Tumbled Glass (total rhyme) was bad. My Mowed Grass ended up on my Tumbled Glass. I have no idea what happened. So I went to Peacock Feathers to try to darken up my sky since I knew I could almost kill the darker color by watering the daylights out of it and picking up the ink with a paper towel. That did not quite work as I expected. This almost ended up in the garbage, but I was determined to make it work. Am I absolutely happy and okay with the outcome? No, but it works, kind of. It's a card. It's handmade. It happens. It's life. It's an epic fail!
I let this one sit overnight until I figured out what to do with it. Using this particular stamp set for the sketch was a challenge in and of itself. It's simply not the right stamp set to use, but I really wanted to color up those dinosaurs and my other stamps in the set. You will not see anything remotely close to this card that will be submitted at CardChallenges.com. You're going to see flowers and other things and some great clean and simple cards since the sketch was pretty CAS. What happened was I colored everything up first and then went to take a look at the sketch.
I used Memento Tuxedo Black to stamp out everything, including my sentiment, onto an A2-size Grout Gray card stock base. I then die-cut the watercolor panel using Blueprints 24 and cut the circle per the sketch. I did turn the sketch from portrait to landscape. Then I grabbed the Tim Holtz Distress Ink colors listed above and started to blend and blend and blend and then blend some more, also described above. I really gave the watercolor card stock a serious workout. I used a sun die-cut from Lemon Drop card stock in the upper left corner with the clouds dies next to it lightly distressed on the edges. I had a long moment about how to balance out the card in the upper right corner but thought where I picked up the ink would work okay and it did. I adhered some fun foam to the back of the Blueprints 24/image panel and adhered it to my card base. Previous to that, I used my MISTI to stamp the sentiment at the top of the card and lined up a second sentiment inside the circle at the bottom of the card. I used Spectrum Noir Essentials and Floral Colored Pencils Collections to color in all of my images. For the little dinosaur spots, I used a Stampin' Up! marker to color those in. Gamsol and colored pencils then adding ink? Not the best combination, but it worked. I had to accentuate the dino spots.The colored pencils are basically colored wax, then add a toxic chemical on top and a water-based ink is not going to work very well. I did use the small end of the marker to be on the safe side.
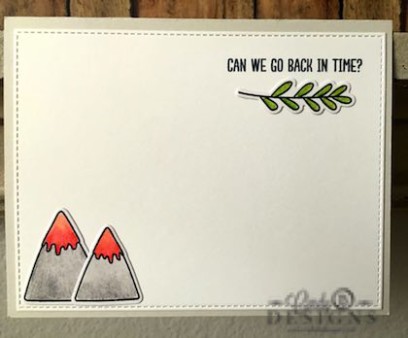
For the inside of my card, I found a piece of white card stock that had already been die-cut with Blueprints 13, stamped another sentiment inside, adhered a leaf image, added my little volcano mountains, and then I was done! All products are from My Favorite Things Stamps.
Thank you for stopping by to visit me today. I hope you like my card. I do. It's cute. I really like how the stamp set is designed so that the dinosaurs are looking at each other. I'm not much of a scene card maker, but I'm working on that. I hope you're having a great day and God bless!
I have a totally cool wedding card (yep, wedding!) coming up for you with a video in the next few days where I'll be doing a product review on the Ken Oliver Stick It Adhesive. This is another MUST HAVE NOW, always and forever staple in your craft arsenal. I have never, ever found an adhesive that you can use on vellum without it showing through at all and that's also one of the reasons why I shy away from vellum, which is so pretty. Now, it's my friend for life and so is that awesome adhesive. I actually used it on an entire card front. My wedding card is totally cool, black roses and all. Okay, maybe it's a tad goth, but you'll get it once you see it. It works.


Shop Cindy B Designs Boutique. You will love the experience! Simply click on the shopping bag above and enter a world of beauty hand-crafted for you.

Need Stampin' Up! products? Just click on the button above to shop with me 24/7 from the comfort of your own home!