Hello there everybody! I hope that you are enjoying your weekend so far. Here is my card for the Paper Craft Crew Mid-Week Inspiration feature. I had a video prepared that took all day yesterday to film and edit. In the long run after much disappointment, it was just too long as there was so much to show you. I think I am going to make another video and break it down into the techniques that I wanted to show you. I'm also heading to Best Buy this week to purchase a headset with a microphone so that I can speed up the videos by 3x at least and then do a voiceover.
I had a card and video for last week's Mid-Week Inspiration. I apologize for not getting it up at all. I knew my son was moving down to start his junior year of university, so I did everything early. I don't know what happened, but all of a sudden the day was here that he was moving down and it just came out of nowhere.
All products used are available right now for purchase at my Stampin' Up! Online Store! You can shop 24/7 at your convenience.
For today's card, here are some of the techniques that I did.
1. I did some double dry embossing using the Stylish Stripes embossing folder on the Smoky Slate striped DSP. Be sure to use a piece of copy paper on top of your DSP. SU EF are so deeply detailed, you do not want your paper to rip. Then I simply turned the DSP over and ran it through my Big Shot again using the Multi-Purpose Platform on Tab 1 to get the very cool looking crisscross pattern on the DSP. The Multi-Purpose Platform is not an item in my online Stampin' Up! store; however, it does come with the Big Shot upon purchase.
2. All of my airplanes are stamped using Memento Tuxedo Black ink, but stamped off once.
3. I achieved the ends of my banners in a few unconventional ways using the Banner Triple punch for my Smoky Slate panel and the Chevron Border punch for my Soft Sky panel. The Banner Triple punch perfectly accommodates card stock that is 1", 1-1/2" and 2" in width. My card stock was cut to 1-1/4" width, so there was a little wiggle room to keep the card stock and punch straight to get your perfect banner cut. The trick is to slightly hold down the punch lever while adjusting your card stock.
4. I lucked out and found a piece of old Basic Black textured card stock and die-cut that using the Deco Labels Collection Framelits. There are 4 dies in this collection and I used the die one up from the smallest.
5. Who knew that the Sprinkles of Life stamp set and the Tree Builder punch could be so versatile? I used one of the cupcake toppers as my cloud stamped onto Soft Sky card stock and heat embossed with white powder. The Cupcake Builder punch is another great alternative to get clouds too. While experimenting, you can use the same image that I did from Sprinkles of Life with the Cupcake Builder punch to get the detail on your "cloud."
6. For my Soft Sky banner, I cut that to 5-1/4 x 3/4" and used the Chevron Border punch to get my banner ends. Make sure that the pointed end is facing toward you. I turned the punch over/upside down to view, center and punch.
I started today's card using the fabulous Sky Is the Limit stamp set from the Sale-A-Bration brochure. This is Stampin' Up's! biggest event of the year. The brochure and products are so awesome and loaded with exquisitely beautiful designer series paper that I've never seen anywhere else and stamp sets. The products are so very unique and you will want them all! I would even go so far to state that they are craft staples that you will use over and over again with the timeless and classic images that will never go out of style. The exciting part is that for every $50 in product that you purchase, the Sale-A-Bration products are FREE and there is no other way to get these products. You have your choice of 3 very fabulous designer paper series 12 x 12 packs, 1 new Project Life bundle, 7 stamp sets – some with 2-step stamping for even more possibilities, all of which also coordinate with the new Spring Occasions Catalog. If you love beautiful florals and birthdays, then all of the new products in the new Sale-A-Bration Brochure are just for you! This promotion ends on March 31, 2016 and you do not want to miss out. The Spring Occasions Catalog is one of the best I've ever seen, and it's also heavily packed with florals and birthday-themed products too – it seems like I'm saying that just about every catalog now as Stampin' Up! products just keep getting better and better! There is a tremendous amount of inspiration in both catalogs and something for everybody. To shop at my personal Stampin' Up! Online Store, simply click HERE or by clicking on the image pictures below to see the content of both catalogs! There are so many wonderful products for you!
If you do not have a Stampin' Up! demonstrator, i would love the opportunity to earn your business by sending you all 3 catalogs that are available right now, answer any questions that you might have or assist you in any way that I can. I do plan on making a blog post early next week as to why now is the perfect time to become a Stampin' Up! Independent Demonstrator and join my team of The Creative Stampers. With the starter kit of $99 that has business products and $125 of products of your choice, and a 30% discount on your first order, there is no better time to join! I encourage you to check out my online Stampin' Up! store for additional information. And please, never hesitate to contact me. I'd love to hear from you. I am starting my 10th year as a Stampin' Up! demonstrator and it's been a lot of fun. The people and new friends that I've met along the way are worth it alone.
I will admit that I am an "equal opportunity" stamper and use other company's products, but I still keep returning to my stamping roots.


This week's card loaded with various techniques of using images in ways that they are not designed for, such as the Sprinkles of Life with the coordinating Tree Builder punch for a cloud when it's really a cupcake topper. I used the Cupcake Builder punch for another cloud but then decided not to use it on my card, but that certainly is another option to make a cloud. I stamped on designer series paper and then double embossed it using the Stylish Stripes embossing folder. I used 2nd generation stamping and 2 very unconventional ways to get the banners on 2 of my panels. There is more of a detailed description above.
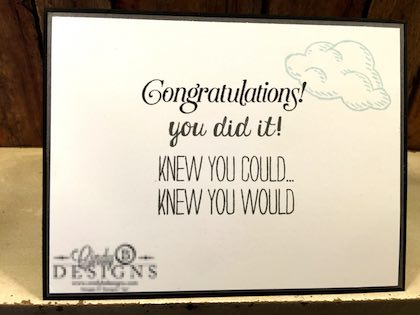
I made this masculine card for my son that has a bit of my father in it since dad was an airplane man working for TWA for 35 years before he retired. There's a little sentiment overload on the inside of the card using the Bravo stamp set, but I had a lot to say! I'm so very proud of my son and his accomplishments thus far in his college career. He's one special young man.
I hope that you enjoy this week's card.
As usual, please stop by the design team member blogs to see what they made for you and leave them a comment. They always appreciate your comments as they all work very hard to bring you the best weekly inspiration.
We all thank you for stopping by today to visit us and don't forget about the BLOG CANDY that we have for you! We would love for you to join us this week at the Paper Craft Crew!
I couldn't make up my mind which pictures I liked the best, so I uploaded them all. Enjoy!


Product List


