Hello there friends! Today I have a totally out of the box card for me. I'm fashionably late to the shaker card trend so I decided to make a card for my youngest son, who absolutely loves them. I had sent one everybody a few weeks ago, but I think he wants his own and so I made him his own. I'm entering this card into the Tim Holtz 12 Tags of 2015 for November 2015. I will eventually end up CASEing his tag, but in the meantime, I did a card. Tim said that he makes tags, cuts them up and they make their way onto a card. I skipped the making a tag part and put this straight onto a card. I'm also entering this card into a new to me challenge at the Mixed Media World Challenge Blog. I really want to explore and create more Mixed Media items in 2016.
Moose has a lot of changes coming up in life – all very good changes. He will be living with me most of the time. He wants to try the "young adult" thing by living in student housing and I found a fabulous place that I'm very comfortable with. Scott has been here with me a lot lately and we always have the best time. He's really matured into a fine young man that I'm exceptionally proud of and our relationship is very different, but in a good way. I'm still mom and will pull rank when I need to. After all, that is my prerogative and always will be. I know I will be on laundry duty and the big draw is that he likes to take baths. I happen to have a large garden soaker tub with Jacuzzi jets with a great chandelier hanging over the tub. Atmosphere is everything. I have one of those metal racks that stretch across the tub all decorated up with candles, bath salts, all of the good stuff, and he loved every single second of it. I almost sent in a rescue party for him, but he came out and said that all of the stress of the semester just melted away. He has been struggling with Physics 4, and let's admit that is not an easy class at all. He wasn't kidding about that bath washing away his stress. He had a test a few days later and got a 78 on it! That is a great test score for him. So my "baby" is going to be here a lot taking his baths – I've already been forewarned and can't wait, and I will do his laundry for him while he's soaking and cook him whatever he wants. The upside for me is that it will also get me out of cleaning the bathtub. It's a bit hard on the back and Scott likes, of course, clean tubs. This is pretty exciting for both of us.
Back to my shaker card, I used so much stuff on this that it's not even funny. It was critical to get this blog post up ASAP since I still have all of the products used lying all over my craft room floor and it already looks like an F5 hit it since I'm not even really organized yet from moving! I must get organized since I have a very popular blog featuring my craft room on December 3. The craft room you will see is just what I'm using now that is not working for me. Brandy Cox did a video the other day with part of her new craft room put together since she just moved and it's beautiful! I am not utilizing my space to its fullest and most effective.
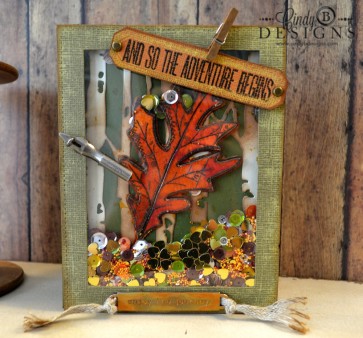
With my shaker card, I found some Distress Core'dinations Card Stock. I cut my panels from the Lawn Fawn Large and Small Stitched Rectangles, which is quickly becoming a go-to staple for me. The back panel, or card base is Stampin' Up! Mossy Meadow and I cut a frame with the Core'dinations Forest Moss, sanded it with my Tim Holtz Sanding Block by Idea-ology, the ink distressed the edges using Frayed Burlap Distress with my Mini Ink Blending Tool and 1" Frayed Burlap Cube. I then die-cut the fabulous Birch Trees Thinlet by Tim Holtz and Sizzix using My Favorite Things Primitive Cream Card Stock. I used my ink blending tool again with Frayed Burlap and lightly distressed the Birch Trees using my Ranger Craft Mat. I applied adhesive to the back of the Birch Trees and adhered to the Mossy Meadow card base.
I pulled out my individual Leaf Blueprint stamp set by Tim Holtz. Even though this image can be found in Tim's other regular Blueprint stamps, this leaf stamp is a little bit bigger and had the coordinating die-cuts that came with it. You get a full leaf die-cut, 2 additional die-cuts (one of each side of leaf), and the sentiment die-cut that you see at the top left of the card. I die-cut the leaf dies, all 3 of them, and then got to work on water-coloring all of the leaf images. I wanted vibrant leaves and to achieve this look, I used Tim Holtz/Ranger water-color pre-cut card stock with the rough side up that I stamped with Ranger Black Archival Ink, since it is waterproof.
At first I scribbled my Distress Markers onto a large clear block for my color palette and spritzed it several times with my water spritzer. I wasn't getting the depth or dimension that I wanted so I went straight to my Distress Ink 1" Cubes, smooshed them onto my craft mat, spritzed again, and got the colors that I wanted. I did a lot of mixing and matching of colors to get all of the beautiful fall colors in my leaves. The colors that I used will be listed below in my Supply List.
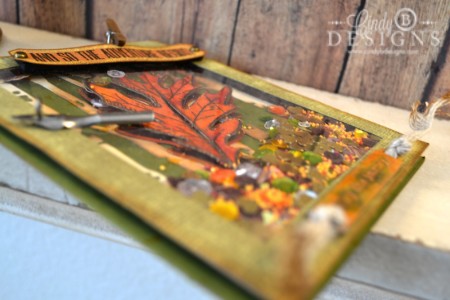
After I had all of my leaves colored, I adhered the large full leaf to the card with black foam tape. I'm getting into this thing where I have to use black foam tape when using dark card stock. It blends in better and white is so obvious. I applied 1/8" Scor-Tape to the edges of the half leaves and adhered them to the full leaf adding a few black foam dots for a bit of dimension on the leaves so you can easily see this inside the shaker card. I also bent the leaves up a bit for extra dimension. Since I doubled up on my foam tape for my shaker card, this was easy to do and I wanted to put a lot of cool stuff inside Scott's card.
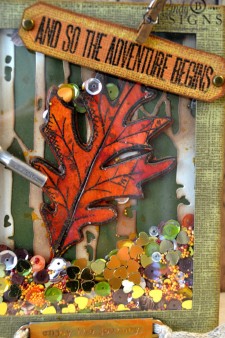
The Lawn Fawn Stitched Rectangle Dies cut perfectly for an A2 card. I also cut a piece of acetate using the same dies and adhered that directly to my frame with Scor-Tape to keep it secure. As stated above, I doubled up my black foam tape and left the release backing adhesive on so that I could fill up my shaker card. I used clear sequins, gold hearts, Woodgrain sequins and the Autumn Mix from Pretty Pink Posh. I used My Favorite Things Prills (so love this new product!) of autumnal colors mixed together in Gourd-Jus. You have to love the names of these seed beads too – except that they are not quite seed beads. You will have to check them out for yourself. All Prills are different sizes and colors that you can use on anything.
I also die-cut the frame in the Leaf Blueprint onto Rusty Hinge Distress Core-Dinations, sanded that down to show the inside color of the card stock, stamped the frame that came with the set, heat embossed it using Tim Holtz/Ranger Scattered Straw Distress Powder and once again distressed the edges with Frayed Burlep Distress Ink using my Mini Ink Blending Tool. I added bronze brads to each end of the sentiment panel and put glue dots behind the brads and black foam tape under the sentiment so that it would stick to the acetate window. I used a wooden clothespin from my stash to accent the sentiment. I stamped the sentiment onto the card stock using Versamark Ink and heat embossed it with Stampin' Up! Early Espresso Embossing Powder. My sentiment is from the Tim Holtz Life Quotes stamp set.
It was at this time that I loaded the shaker card up with all of my shaker products, pulled off the backing tape and then directly adhered it to the card front. It turned out perfect since my die-cuts were perfectly sized.
I highly recommend using 2 must have tools when making a shaker card: (1) A Swiffer cloth, and (2) an EK Success Powder Tool. You will want to run the Powder Tool along the edges of the foam tape, which is still sticky on the sides that will be facing inward towards your shaker card and you need to kill the tack of the foam tape. The Swiffer cloth is used to clean up any leftover powder and I also used it to wipe off any static from the acetate. The Swiffer will not scratch your acetate either. Total bonus.
After my shaker card was assembled, it was time to accessorize the outside. You may consider some of the elements I used as "weird" or not really fitting, but this is a customized card for my son. I found some Tim Holtz Idea-logy Screw Eyes and screwed one into the left middle of the frame. Having the foam tape to anchor this made it very easy. Attached to the Screw Eye is a Pen Nib. Scott was born in the wrong decade and right now he is obsessed with Fountain Pens. The Pen Nib is representative of that. We were going to go to the office supply store yesterday, but since he knew I would get him a pen anyway, we skipped that after his orientation at university.
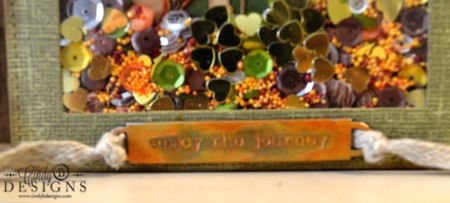
For the bottom of the card, I used a metal word band that reads, "Enjoy The Journey." Perfect for Scott. Since the metal word band is made for you to "junk it up" with various Distress products, I did just that. I shook up a few bottles of Distress Paint in Antiqued Bronze and Fossilized Amber, as well as some Ranger Adirondack Gold Acrylic Paint. I smooshed all 3 colors onto my craft mat and then applied it directly to the metal band and I used my fingers. It came out very cool looking in real life.
My last step, which I do wish I had done something different with, was to use some Tim Holtz Linen Ribbon. This stuff is fantastic. You can distress it, dye it, everything. I had already put my card together or else I would have ran the ribbon through the metal word band and wrapped it around the back. Instead, I ended up with some very bad knots which totally bulked it up, frayed the ends of the ribbon and added more Frayed Burlap Distress Ink to show off the ribbon a bit. I love that you can pull this ribbon apart, fray it, even make it wider. Again, it's brilliantly thought out and that's one thing I love about Tim's products is that they all play together perfectly and can be used on anything and everything.
I hope that you enjoy my card today and thank you so very much for stopping by to visit me. I really appreciate it. I hope that you will come back by soon for other projects. God bless you and have a great day!

Jeremiah 17:7
For the inside of my card, I had die-cut some cork from My Favorite Things. I like their cork because it is thicker than the brands with the adhesive on the back. I can easily add my own adhesive using a sticker sheet. This was originally supposed to go on the front, but I changed my mind. This was also distressed a bit with Frayed Burlap Distress Ink.
I once again cut a piece of My Favorite Things Primitive Cream card stock, distressed the edges, distressed the sides of the panel with Frayed Burlap, stamped the full leaf image once again with Sahara Sand ink by Stampin' Up! and then stamped the mail sentiment using Stampin' Up! Mossy Meadow from the Tim Holtz Way with Words stamp set. 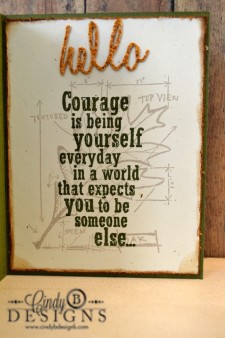

All supplies listed are in the Tim Holtz line of products by various manufacturers unless otherwise stated.


Shop Cindy B Designs Boutique. You will love the experience! Simply click on the shopping bag above and enter a world of beauty hand-crafted for you.

Need Stampin' Up! products? Just click on the button above to shop with me 24/7 from the comfort of your own home!
This is absolutely fabulous! I just know you'll be one of Tim's favorite! This is spectacular!!!
Absolutely stunning Cindy. The textures are amazing. The colors are gorgeous. You just ROCKED it. Thanks for sharing with us at Mixed Media World and we hope you join in our challenge next month as well.
With smiles
Laine K
DT Mixed Media World
Beautiful card. The colors are gorgeous. Thanks for sharing with us at Mixed Media World.
With smiles
Laine Kammeraad
DT Mixed Media World